
Klauke have a FREE e-Book available with lots of Tips & Advice on the Correct Crimping Procedure. Read the tips and download the e-book here...

Effortless Crimping For Clean Results
Before starting the crimping process itself, you should make sure that the components are clean. Brush the conductors so they are metallically clean and check the aluminium cables for any visible oxidation layer, which must be removed. Generally speaking, you should ensure that no metal traces remain on the conductor, since this can cause contact corrosion.
The use of good wire strippers ensures clean stripping of the cable. At the same time, there should be no damage to the conductor and the length of the stripped section should be around ten percent longer than the insertion dimension of the cable lug or connector.
This is because crimping lengthens the cable lug or connector by around ten percent. So don’t scrimp on the stripping! Make sure that the crimping dies are not damaged or dirty. The profile should be metallically bright.
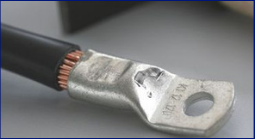
Corrrect Crimping Procedure - Lugs & Tool From Same Manufacturer
Once the connector and conductor are prepared, you can start the crimping process. Cable lugs can be correctly and cleanly processed without under or over crimping only when a suitable tool is used. In other words, cable lug and crimping tool should be from one system: the same manufacturer for cable lug, connector and tool. Matched tool components and competent crimping prevent
excessive transfer resistances and the resultant elevated temperatures, which in the worst case can cause fires.
Crimping on a cable lug always starts on the connection side and works towards the cable side. On a connector (splice), however, the first crimp is in the centre. Otherwise, the material cannot elongate and cracks can develop.
With compression cable lugs, for example, the number of required crimps according to DIN 46235 is indicated by marks on the cable lug and connector. With tubular cable lugs, the number of crimps can be checked in the catalogue.
Be sure to complete the crimping process. A complete crimp is important, since the crimped material achieves the required compression only towards the end of the crimping phase. This is the only way to guarantee a correct crimp.
Mechanical or Hydraulic Crimping?
The crimping tool is the key element of any crimping process. No matter whether this is done hydraulically or by muscle power:
as the cable lug is crimped, the degree and type of deformation is defined by the tool or the contact-specific wear parts of the press.
Only tools optimally matched in terms of contact create a high-quality connection. Whether a mechanical press or an electro-hydraulic press is the right choice for you depends on your field of application.
Compact mechanical crimping tools are suitable for small to medium cross-sections. For larger cross-sections, on the other hand, you should generally go for a hydraulic tool with interchangeable dies. You should also consider the number of crimps. Indeed, hydraulic tools are more suited to larger quantities than mechanical ones. Klauke mechanical crimping tools are set apart by synchronous profile dies, which can be conveniently set parallel on both sides in a single-handed operation. In addition, the adjusting wheel indicates the suitable cross-section. This significantly reduces the amount of effort required.
Although for small and simple crimps, you can apply sufficient pressure using mechanical pliers, large conductors are now crimped by electro-hydraulic presses as standard. Also, the latest generation of electro-hydraulic tools warns optically and acoustically if the required crimp pressure is not reached. High-quality mechanical crimping tools have integrated mechanisms to guarantee a complete crimp.
Free Klauke Correct Crimping eBook
